Wednesday 31 August 2011

Peanut butter chocolate-chip cinnamon cookies...

Another weekend another 12-hour, round trip, bus journey to Plymouth.  This time though as it was a three day weekend, (God bless you bank holiday weekends), it was a tad more bearable!  A much deserved (at least I think a much deserved) chilled out weekend spent surfing, eating, drinking, making cookies and meeting the boys' new puppy...

Eleven weeks old, cute as a button and incredibly excited about EVERYTHING she was utterly charming!   She even managed to be enchanting when she was delivered back drunk from an afternoon walk to the pub (having lapped up almost an entire unguarded beer)...


The new addition to the household watched every move avidly while I was pottering around the kitchen.  I decided as the oatmeal raisin cookies I’d made last time had been such a success I’d try a new variation of cookie this time – helloooo peanut, chocolate and cinnamon cookies!  How tasty are you?!  I found the recipe (predictably - again!) while browsing through the Martha Stewart website.

Admittedly I was less prepared this time and hadn’t brought the bags of pre-measured ingredients so had to resort to measuring everything using the only implements left in their kitchen - a small mug and an ice cream sundae spoon.  Thanks to this very forgiving recipe the cookies still came out perfectly.

They were quite large so this quantity only yielded two dozen - all of which were hovered up within the following couple of hours (and not all by me I might add, somehow I managed to restrict myself to only eating three). 

Compared to the luxury of my long weekend, Tuesday morning brought me back to earth with a bang - I got my first ever puncture on the way to work while freewheeling down a hill, then had to drag the bike to the nearest station and wait for a train.  Then I fainted on the train so had to get off and walk the rest of the way. 

It made me feel like something out of a mills and boon book, one of those absurd corset clad ladies constantly in a swoon... smelling salts at the ready!  Looks like I’ll be needing some comfort food this evening, maybe another batch is on the cards? (Any excuse!)

Preheat the oven to 180˚C.  Whisk together the flour, bicarbonate of soda, salt and cinnamon until mixed and aerated.  Blend the butter and peanut butter until combined.  Add both sugars and continue to beat. 

Mix in the eggs and vanilla essence. Gradually add the flour mixture until just combined.  Fold in the chocolate chips and peanuts then chill the mixture in the fridge for approximately 15 minutes.

Spoon out equal lumps of dough and roll into approximate 2 inch balls.  Space 3 inches apart on a lined baking sheet and flatten slightly.  Bake until barely golden (approx 13 minutes – oven dependent).  Cool on a wire rack.
2cups plain flour
1tsp bicarbonate of soda
1tsp table salt
½tsp cinnamon
170g butter
½cup peanut butter
1cup brown sugar
½cup white sugar
2 large eggs
2tsp vanilla extract
1 ½cups dark chocolate chips
2/3cup roasted, salted peanuts, chopped
 

Tuesday 23 August 2011

Bill the Burglar Butterfly Piñata, cupcakes and a vat of cream cheese frosting...

Saturday (the morning of my flatmate’s birthday-BBQ) dawned bright and sunny.  Being eternal optimists we blithely ignored the weather forecasts suggesting imminent rain and began clearing up and decorating the garden. 

Sad looking plants were tidied; paper bunting draped; balloons blown (early morning head rush!) and strung up... all lorded over by a Butterfly piñata I'd made, dangling from the ancient washing line in the centre. 
The piñata bizarrely become known as Bill the Burglar Butterfly.  It was named by my brother during a visit last week.  Apparently the eyes reminded him of a book we used to have when we were kids.  Personally I think it looked more like a teenage mutant ninja turtle but for whatever reason Bill the Burglar Butterfly stuck...
In predictable style as soon as we’d finished, the heavens opened drenching everything  (except Bill who we managed to speedily cacoon in bin bags).
Everything was hurriedly rushed back in and repositioned around the lounge.  Almost immediately after which the clouds got bored and headed off elsewhere...

In the end the piñata didn’t get beaten into submission– apparently it's too cute (now I can see why farmers don’t name their livestock!).  I’m informed he’s been adopted as our house mascot – to be honest I’m not convinced... he may end up meeting with an “unfortunate” accident!

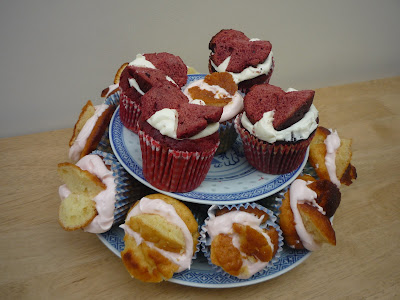
Between our hokey cokey of decorating (...in out in out shake it all about...), I made a mountain of cupcakes.  A mixture of red velvet ones from this hummingbird bakery recipe and vanilla ones from this Nigella recipe.   I then made almost a kilo and a half (goodbye healthy cholesterol levels...) of cream cheese frosting to ice them all...  

Preheat the oven to 180˚C.  Pop paper muffin cases in a muffin tin.

Cream together the butter and sugar.  Add the eggs one at a time, alternating each with a large spoonful of flour.  Fold in the rest of the ingredients one at a time.

Spoon the mixture into the cases – if you fill the cases to 2/3 full the cupcake should rise nicely without spilling any excess mixture over the top.

Bake in the oven for 15-20 minutes (keeping a close eye on them) until risen and lightly golden-brown. Cool the cupcakes in the tin for a few minutes then cool completely on a wire rack.

Meanwhile, make the icing.  Slowly beat together the butter and icing sugar until well mixed.  Add the cream cheese and beat on medium-high until  light and fluffy – approximately 5 minutes.  I iced the red velvet cupcakes with plain white icing and dyed the vanilla cupcake icing pink with a few drops of colouring.

Once the cupcakes have cooled, cut a round hole in the top of each cake with the knife at a 45˚ angle creating space for the icing to fill. 
Spoon the icing into the top of each cake.  Cut the lids in half and position them in the icing, poking up like butterfly wings.

Vanilla Cupcakes: (makes 24 large cupcakes)
225g butter, room temperature
300g sugar
6 eggs
350g plain flour
½tsp bicarbonate of soda
250ml natural yogurt
1tsp vanilla extract
½ vanilla pod, seeds scraped

Cream Cheese Frosting: (makes enough for 12 cupcakes)
300g icing sugar, sifted
50g butter, room temperature
250g cream cheese, chilled


Friday 19 August 2011

grump·y adj. grump·i·er, grump·i·est - Surly and peevish; cranky.

Thursday was a grumpy day: grey, raining and August for God’s sake!  I almost got run down three times on the way to work, then was forced to miss two deadlines due to a combination of faulty systems and late vendors... I got soaked huddled in a doorway over a tupperware of lukewarm soup for lunch and utterly drenched on the cycle home.  By the time I got home, I. Was. GRUMPY!

Thankfully, I spent an hour in self-imposed solitary confinement, making dinner for my family.  They arrived, blissfully not hangry or the evening would have ended in tears before it even began.  Every time I see them they're laden with gifts, this time it was hundreds of jam jars, two baby ferns a lavendar and (joy of joys), a spare rolling pin.  Move over cling filmed bottle! 

Months ago, one of the presents Mum and Dad brought me was some Greek honey from my Aunt and Uncle’s house in Poros.  What a difference good quality honey makes -  usually it's too cloying and sickly sweet for my tastes but this stuff is amazing!  You can actually taste the citrusy flowers... It seemed fitting to turn some into Baklava... so never having tried to make it before I found this recipe to follow.

While on the Greek theme I decided to start the meal with a dip made from yellow lentils called Fava.  I was introduced to it in Poros and am hooked!  It's a similar concept to hoummus but much more interesting and terrifyingly more-ish!  Apparently, it's a winter dish but who could restrict themselves to eating something so good for just quarter of the year?

And so, with good food and a healthy dose of denial I forgot the rain drumming on the roof and got lost in a case of the warm and cosys.  This morning dawned a perfect day – cool air, warm sun... life and leftovers are good...

Fava:
Soak the lentils overnight in cold water.  The next day drain and rinse then place in a pan with the garlic.  Cover in fresh water and bring to the boil. 

Boil until dry and very soft – you may need to add more water during the cooking if it dries out  before the lentils collapse, just keep an eye on it. 

Leave to cool then stir in a really generous drizzle of good quality olive oil and the lemon juice. 

Top with the red onion and capers and drizzle with more olive oil.  Mix at the table and serve with toasted pitta breads to dip.


Baklava:
Preheat the oven to 180˚C. Toss the mixed nuts and cinnamon together. 

Butter the inside of your chosen dish.  Place two layers of pastry in the bottom of the dish and sprinkle with approximately 3tbsp of the nut/cinnamon mixture.  Place another double layer of pastry over and brush with butter. 

Repeat until your ingredients are used up – finish with pastry as the top layer.  Cut the raw baklava into individual portions.  I believe diamonds are traditional?

Bake in the oven for approximately 50 minutes or until golden and crispy.

Meanwhile during the last 20 minutes of cooking place the sugar, water and lemon zest in a pan and gently heat until the sugar is dissolved.  Simmer 20 minutes until the pastry is cooked.

As soon as the pastry comes out of the oven spoon over the sugar syrup.  Sprinkle with the chopped pistachios.  Finally, gently heat the honey until it is liquefied and drizzle over the top.


Leave to cool completely and serve with greek yogurt and/or vanilla icecream.


Fava: (serves 4)
4 handfuls of yellow split lentils
1 clove of garlic, peeled, whole
Olive oil
1 lemon, juice
1 small red onion, finely diced
2tbsp capers
Pitta  breads, to serve

Baklava: (serves 4-6)
250g mixed nuts, chopped
½ tsp ground cinnamon
1 pack of filo pastry
100g butter, melted
75g water
75g sugar
75g honey
¼ tsp lemon zest
50g pistachios, chopped

Wednesday 17 August 2011

Chicken Cesar Salad...

Cesar’s salad is one of my great guilty pleasures – it pains me to admit it but there’s just something I love about its corny, overexposed spirit.  Sadly though, it rarely lives up to the expectation and dies a horribly turgid death in almost all of the limp and overly-processed incarnations you find on the market...  Thankfully it’s extremely easy to whip up.  Ideal for a quick mid-week dinner, I made last night’s offering in about half an hour...

My friend who had popped in to eat with us was most impressed by the croutons and asked for extras of “that stale, old bread”... to be honest I’m not sure whether to chalk that up as a triumph or disaster...

Preheat the oven to 180˚C.  Tear the ciabatta into bite-sized pieces and place in a large oven proof dish in a single layer.  Drizzle with olive oil, season with salt and pepper and sprinkle with the crushed garlic and some parmesan.  Mix with your hands until the bread is thoroughly coated with the oil and seasonings and pop in the oven for about 10-15 minutes or until golden. 

Meanwhile, fry the chicken in olive oil over a medium heat until cooked through.  In a separate pan dry fry the lardons until golden.

Put the raw egg, garlic, Worcester sauce, Dijon mustard, anchovies, and lemon juice into the blender and blend until smooth.  With the blender running slowly trickle the oils through the spout until you have reached the desired (emulsified) consistency. 

Obviously with the raw egg it’s not great for the old/young/pregnant people in your lives but you can substitute a generous tablespoon of store bought mayonnaise in place of the egg if needs be... 

At the last minute, dress the lettuce leaves and then assemble the salad.  Sprinkle extra parmesan over to taste and serve as soon as possible.


Chicken Cesar Salad: (serves 3)
3 baby gem lettuces
3 chicken breasts, sliced into strips
160g lardons
Parmasan, grated or shaved
1 loaf of chabatta
1 clove of garlic, crushed
1 avocado, coarsely chopped
Olive oil
Salt and Pepper

Cesar Salad Dressing:
1 egg
1 clove of garlic, whole
1tbsp Worcester sauce
1tsp Dijon mustard
3 anchovy fillets, whole
1tbsp oil from the anchovy fillet jar
 ½ a lemon, juice only
Olive oil

Tuesday 16 August 2011

Schiacciata con l’uva (otherwise known as “Grapey Bread-Cake”)

I've just spent another great weekend surfing.  This time I came equipped - a brand new board significantly shorter than anything I’d ridden before, and a loaf of semi-sweet grape foccacia half way through its second proving. 

Trying to fit all four girls, improbable amounts of baggage, a weekends worth of food and a surfboard into a saloon car was the first of many tests.  After some careful juggling, (“...watch the fins... WATCH THE FINS!!”), we finally managed to wedge everything in and were off to spend another Friday night bonding with the M4.

Our surf-trips have come to rely on a superb formula of spending as much time as possible in the water before exhaustion sets in... then spending all of our time out of the water eating and drinking as much as physically possible. 

This trip, I’d decided to supplement the usual brunch fare with a loaf of sticky grape foccacia which should technically be known as Schiaccia con l'uva, but which spent the weekend being referred to as “that grapey bread-cake”.   Now, grapey bread-cake doesn’t really do it justice but I guess it’s a darned site easier to pronounce! 

The idea was one I'd found years ago to use up a surplus of my parent’s seedy grapes but shamefully had never got around to trying.  Unfortunately having tried it (and fully enjoying the results), I'm painfully aware that sharing it will seriously reduce the number of bunches I’ll be receiving in future. 

The girls (understandably) weren’t really sure what to expect from a sweet foccacia but once tried it was a surefire hit.  Sweet but not sickly – the perfect treat to start the day with!  It was especially good when we got around to having our second round a few hours after baking by which point it had become amazingly dense and sticky. 

After our first day's surfing we headed to the local old man’s pub where said local old men were greatly bemused by the four screeching girls playing a newly developed game of long-arm darts.  

Apparently the new technique was supposed to increase the power of your throw.  All I know is my first attempt ended up embedded in the ceiling followed shortly by a second dart quivering between flip-flopped feet...

So, a weekend of firsts!  My first attempt on a shortboard, my first attempt at “grapey bread-cake” and my first attempt at long-arm darts...  Two roaring successes out of three ain’t bad!

Schiacciata con l’uva:
Mix the flour, yeast, rosemary and salt.  Add the warm water and oil and mix until it forms a cohesive dough.  Knead for 10 minutes and place in the fridge in a oiled bowl covered in oiled clingfilm while it cold proves.  I prepared the dough before work and left it in the fridge for the day.
That evening, knock back the dough and knead again for approximately 5 minutes.  Divide the dough in two and flatten into two disks.  Place one in the bottom of an oiled cake tin and cover with half the grapes and half the sugar. 

Place the second disk of dough over the top and press the edges down to seal the two together.  Put the oiled clingfilm back over the cake tin and put it back in the fridge over night.

The following morning preheat the oven to 220˚C.  Press the rest of the grapes into the top of the bread, sprinkle over the rest of the rosemary and sugar and drizzle with a couple of tablespoons worth of olive oil and some honey. 
Place in the oven and bake for approximately 20 minutes or until hollow sounding.  You may need to place a baking sheet under the tin to catch any escaping juices.


Schiacciata con l'uva (makes 1 loaf):
500g strong white bread flour
7g sachet fast-action yeast
1 pinch salt
275ml warm water
60ml olive oil (plus extra for drizzling over the top)
2tsp rosemary, finely chopped
4tsp (heaped) demerera sugar
1 bunch of grapes
A drizzle of honey

Thursday 11 August 2011

Ravioli and Riots

Thankfully with the civil unrest dying down, I am once again able to tear myself away from 24-hour news coverage and get back into the kitchen.  I haven’t really been in the mood to cook since it started.  There’s something inherently depressing about the state we must be in, where a whole swathe of society is willing to pillage their local communities.  Sad days...

But I’m not going to dwell on those thoughts as it’ll just demoralize me more, so back to the irrelevancies of cooking... There’s a reason they call it comfort food! 

As previously touched on, my flatmate (whom I love very much) doesn’t like cheese (which I also love very much).  There have been many conversations over the years, trying to gauge which I prefer - the jury's still out! 

Sometimes though, not very often but sometimes, I do just forget.  Last night we had ravioli - two types - both containing cheese.   I am a bad friend, it’s only just occurred to me as I’m writing this... honestly, I really did forget!  At least it’s not quite as dangerous as when I used to forget about my old flatmate's serious allergy to shellfish...

First I decided on mushroom ravioli.  Then, to calm my friend who is pathologically enraged by all things mushroom (yes James, I mean you!), there was sweet potato ravioli too.  

So I set about making the pasta, completely ignoring the note of dire warning on my parents pasta machine. I mixed fillings and wound the handle until repetitive strain injury set in.  It took a whole day... WHOLE DAY!  But: a veritable mountain of food... what's not to like?

Basic Pasta Dough:
Place the pasta flour on a clean dry work surface.  Make a well in the centre.  Crack the eggs into the well and lightly whisk.
Gradually incorporate the flour until it is dry enough to mix by hand.  You may need to keep reshaping the flour walls to prevent the eggs escaping.  If adding flavouring (e.g. spinach or herbs) then add at this stage. 

Once all of the ingredients are mixed in, knead for 10-15 minutes.  At this stage, the dough should be silky, smooth and elastic.  You'll probably have to play around until the correct consistency is obtained.  If it seems dry add a little more egg, if it sticks to your hands or the work surface then add slightly more flour. 

Wrap in clingfilm and rest on the side for between 30 minutes and 2 hours. 

Flour the work surface and the rollers on the pasta machine.  Gently flatten the rested pasta.  Pass the dough through the pasta machine on its widest setting.  Change the machine to the next thickest setting and pass the pasta through again.  Each setting needs to be used until you have reached the desired thickness (remember it’ll swell during cooking so you want it thinner than the final product – mine wasn’t quite thin enough and so turned into a VERY substantial meal!). 

Dry the finished pasta for approximately 15 minutes before cooking, to prevent it sticking together. 
It can be kept for up to a week in the fridge.

Polenta or semolina flour will keep the pasta from sticking together.

Now for the fillings and assembling the ravioli.  The fillings should always be cut to incredibly small pieces (think a smooth paste) so that they cook at the same speed as the pasta.  Because they’ll only be cooking for a matter of minutes while the pasta cooks, make sure that meat, fish and hard vegetables are cooked before using as a filling.

To assemble the ravioli, place a sheet of pasta on a work surface dusted with polenta flour.  Dollop teaspoons of filling spaced about 2cm apart.

Next brush the spaces around the fillings with lightly beaten egg.  Place a second sheet of pasta over the top and press lightly to seal.  Cut into squares.


Boil the ravioli until the pasta is al dente.  Meanwhile make the ravioli sauce.  Mix the oil and lemon juice like a vinaigrette, and then gently heat.  Add the tomatoes and warm through, season and add any herbs you might want.  Dress the ravioli and serve.  We had ours with a huge green salad and Jamie Oliver's courgette salad

Mmmmmmmm... leftovers tonight!

Sweet Potato Ravioli:
Preheat the oven to 180˚C.  Roast the sweet potatoes in their skins until soft (approximately 20-30 minutes).  Split the skins open, turn the oven off and let them dry out in the cooling oven.  Once cool remove from skins and mash the flesh.  Grate ¼ of a nutmeg over.  Mix with the crushed chili, salt and Parmesan.

Wilt the spinach in a medium-hot, dry pan until cooked.  Squeeze any excess moisture out of the spinach and then finely chop or puree.  Add the spinach to the pasta dough when kneading.

Sweet Potato Ravioli Filling: (serves 4)
2 medium Sweet Potatoes
¼ nutmeg, freshly grated
1 dried chili, finely chopped/crushed
1 pinch salt
3 handfuls finely grated Parmesan

Spinach Pasta: (serves 4)
4 eggs
400g “OO” flour
1 large pinch salt
150g spinach

Mushroom Ravioli:
Blend the mushrooms to a paste.  Fry in butter with the garlic and thyme until really fragrant, add the sherry and cook until it has reduced/dried out.  Leave the mixture to cool and stir through the crumbled blue cheese and chopped cashews.

Finely chop the sage.  Add the chopped herbs to the pasta dough when kneading.

Mushroom Ravioli Filling: (serves 4)
500g closed cap chestnut mushrooms
50g butter
3 gloves garlic, crushed
2 tsp dried thyme
100ml sherry
90g blue cheese
2 handfuls cashews, chopped

Sage Pasta: (serves 4)
4 eggs
400g “OO” flour
1 large pinch salt
1 handful fresh sage, finely chopped

 
Ravioli Sauce:
240ml olive oil
90ml lemon juice
8 small tomatoes, deseeded and diced
Salt
Pepper